At Mount Kato, your safety is our top priority. We are committed to providing a fun and enjoyable experience for all guests while maintaining a secure environment on and off the slopes.
Your Responsibility Code
Follow Your Responsibility Code
Skiing and snowboarding are lifelong sports and passions for millions of Americans. It is important to know that snowsports involve risk and understand what those risks are. Your behavior, decisions and actions have a direct effect on your safety and others on the slopes. Get started by understanding Your Responsibility Code; talk with your family, kids and friends who are new to the mountain. And remember: staying in control is the best way to stay safe. If you have questions, please ask any ski area employee.
Did you know?
A Ski Safety History
- Code has undergone several revisions to stay in step with modern language and skiing behavior (and to include snowboarders, bikers and everyone who enjoys the slopes!). The latest version of the Code was published in 2022.
- Several other recreational sports have copied the Responsibility Code, including mountain biking.

Your Responsibility Code
-
Always stay in control. You must be able to stop or avoid people or objects.
-
People ahead or downhill of you have the right-of-way. You must avoid them.
-
Stop only where you are visible from above and do not restrict traffic.
-
Look uphill and avoid others before starting downhill or entering a trail.
-
You must prevent runaway equipment.
-
Read and obey all signs, warnings, and hazard markings.
-
Keep off closed trails and out of closed areas.
-
You must know how and be able to load, ride and unload lifts safely. If you need assistance, ask the lift attendant.
-
Do not use lifts or terrain when impaired by alcohol or drugs.
-
If you are involved in a collision or incident, share your contact information with each other and a ski area employee.
Know and Obey the Code. It’s Your Responsibility
If you need help understanding the Code, please ask an employee.
NSAA released a video covering all 10 points of Your Responsibility Code — take a look!
Lift Safety
Winter Lift Safety for Skiing and Snowboarding
Riding the chairlift can be one of the best parts of the day — the views are beautiful, your legs get a rest and you get to catch up with (or make new) friends! But, it's important (and part of Your Responsibility Code) to know how to load, ride and unload all lifts safely. Whether this is a chairlift, a rope tow, or a carpet, knowing how to use these lifts will make your day more fun and safe.
Not sure how to ride a chairlift?
Ask an attendant, ski patroller, or other area employee for help. Learning how to ride the lift is also one of the features of a lesson, and another reason it's worth discovering snow with a pro.
Tips for Riding Lifts Safely
-
Be familiar with the type of lift you are riding and what type of terrain it will bring you to. Ask for help if you need it.
-
Avoid distractions while waiting in the lift line: Do not use your smartphone.
-
Before loading, remove backpacks and secure loose items. Remove pole straps from wrists.
-
Before moving out to load the chair, make sure everyone in your group is ready.
-
Look over your shoulder to watch the chair approach.
-
Sit all the way in the chair, flush with the seat back.
-
If the lift has a restraint bar, wait until everyone is seated, and slowly reach up and lower the bar. Small children should not attempt to lower the bar. Adults and older kids should always help little kids lower the restraint bar.
-
Be aware of your surroundings while riding the lift. If you drop something, let it fall. You can always ask ski patrol or the lift attendant at the top for help retrieving the lost item.
-
As you approach the top terminal, prepare to raise the bar – but do not raise it too soon. Signs will help you know when to raise the bar.
Ski and Snowboard Lift Safety Videos
Check out the videos below for some great examples, tips and tutorials on everything you need to know to ride the lift safely.
Terrain Park Safety
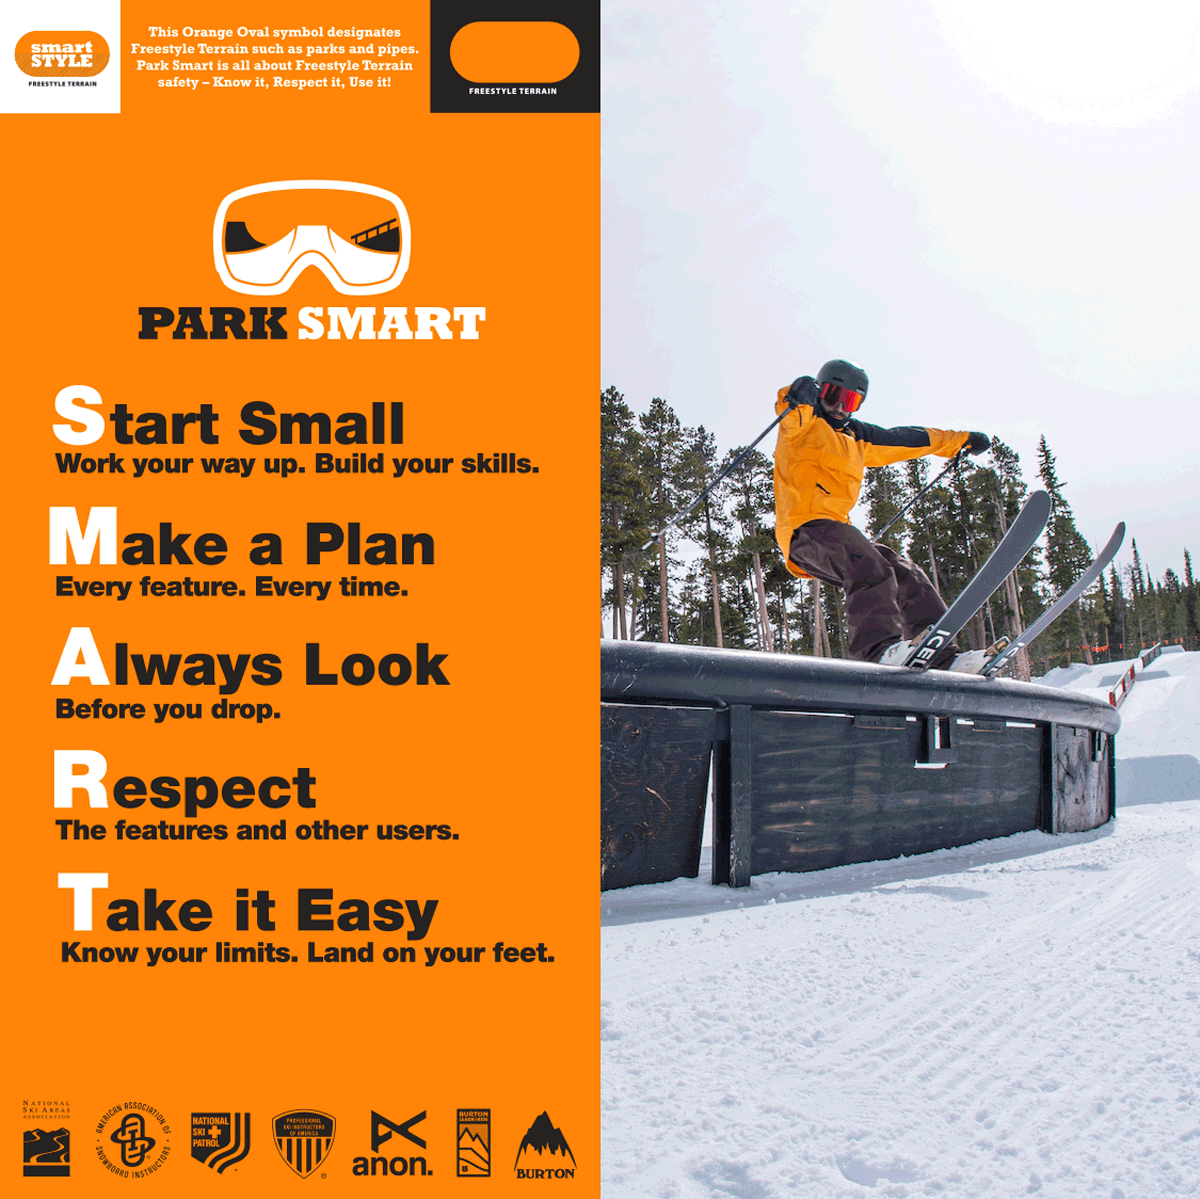
Be Park SMART! Safety Tips for Skiing and Riding
Whether you’re skiing or snowboarding, be Park SMART and reduce your chances of getting hurt by following these safety tips.

Park SMART Terrain Park Safety
START SMALL: Work your way up. Build your skills.
MAKE A PLAN: Every feature. Every time.
ALWAYS LOOK: Before you drop.
RESPECT: The features and other users.
TAKE IT EASY: Know your limits. Land on your feet.
PEEPS
Looking for more information about freestyle terrain, terrain park and Park SMART? Keep scrolling and be sure to check out the PEEPS e-learning course below where you can take a short class on terrain parks and test your knowledge.
Terrain Park Signage
Terrain Park signage features the orange oval. When you see this, you know that the trail you are about to enter features a terrain park. Some ski areas will also list the size of the features you can expect to find in that park.
XS (extra small) parks are a great place to start. Other park sizes are S (small), M (medium), L (large) and XL (extra large). Whether you’re new to the park or looking to learn a new trick, we encourage you to book a park-specific lesson. Start small and work your way up.

Know Before You Go
Know Before You Go
How to Ski or Snowboard: A Beginner’s Guide
Get More Expert Advice
There are lots of ski and snowboard shops on and off mountain that offer gear to rent or purchase. Contact the ski area you intend to visit or your local shop for more information.
Trail Signage
The colored symbols next to the trails are the keys to enjoying your first few days on the slopes. Their shape and color indicate the difficulty of the trail. When you arrive at a ski area, you can find paper trail maps at the lift ticket window or maps of the area on signs arouund the area. Both usually use these symbols to indicate trail difficulty.

Green Circle: Easier
Blue Square: More Difficult
Black Diamond: Most Difficult
Double-Black Diamond: Most Difficult, use extra caution
Orange Oval: Freestyle Terrain
The same trail symbols are used at every resort in the country, but as Albert Einstein must have said, “It’s all relative.”
A Green Circle trail at Jackson Hole, WY, might be as tough as a Blue Square at Sunlight, CO. Not a big deal. The trail ratings are consistent within each resort. So all the “Greens” at a ski area will be about the same difficulty, as will the “Blues” and the “Blacks.”
Before you ride a lift during your first few days, make sure you can handle the trails at the top. Some skiers think they can improve by skiing tough terrain when their skills aren’t up to that level, but that’s a good way to get hurt. Instead, take a lesson. Check your trail map and make sure the trail symbols off of that lift fit your ability. If you have any questions or need directions, go talk to a lift attendant or anyone in a resort uniform. “What’s the easiest way down?” “Where’s the closest groomed trail?” They want you to have fun nearly as much as you do.

What to Wear When Skiing or Snowboarding
Not sure what to wear for your first day on the slopes? We can help!
There's so much gear out there that it can be difficult to decide what to buy, and it's also tempting to layer on as much as possible to protect against the cold! Here are some of the most common items you'll need in order to have a great day out there.
Remember: Comfort and utility are key. Make sure you can easily move your arms and legs, and that you're prepared for the forecast (e.g., wearing a waterproof shell if rain or snow are predicted).
Your Clothing
Your clothing is the key to a comfortable day on the slopes. Below are three key clothing layers to help keep you warm, dry and smiling.
Base layers
These are the first layers that touch your skin. They're responsible for keeping your body at a comfortable temperature. We recommend wearing synthetic fabrics because they are better at wicking away sweat and keeping in heat. Overall, these should feel good and fit relatively close to the body.
Mid layers
These layers can be added or removed depending on how warm or cold it is outside. These should fit comfortably between your base layer and outer layer and shouldn't restrict your movement. If you feel like Ralphie's younger brother in “A Christmas Story,” (can’t put your arms down) your mid layers are too bulky.
Outer layer
Your outerwear is key to keeping you warm and dry. We recommend a waterproof or water resistant jacket and pants. They can be insulated or just a shell — it's all up to your personal preference.
Other Important Skiing and Riding Gear
If it's your first time on the slopes, it might seem like overkill to load up on all of these accessories. But don't worry, many ski areas have these items for rent. You can also borrow from friends and family or check your local sporting goods shop for deals.
Helmets
We recommend everyone wear a helmet, but ski or ride as if you’re not. Keep in mind: Helmets will not prevent fatalities or serious head injuries, but they are most effective at preventing injuries at slower speeds. Make sure your helmet is properly fitted and your chin strap is fastened. Most ski areas rent helmets to the public.
Eyewear
Ski goggles are important not only to protect your eyesight, but also to make sure you can see in any condition. If you're just starting out, we recommend finding a pair of goggles with mid-light lenses. That way, you can see in both sunny and cloudy conditions.
Bright sun reflects off the snow and other surfaces, and you don't want to risk damage to your eyes. Wear a pair of sunglasses or goggles that filter out harmful UV rays.
Sunscreen
You've probably seen a lot of skiers and riders rocking goggle tans. Those are cool, but protecting your skin is even cooler. Always wear sunscreen on the mountain. Many ski areas will have sunscreen available in their ticket offices and in their retail shops, either free of charge or for purchase.
Gloves and Mittens
Warm, weather-proof gloves are key to having a great day on snow. The best materials are insulated, water-resistant leather or a synthetic alternative; cotton or wool gloves won't protect your hands from wind and moisture.
Gloves are better for dexterity (if you need to adjust your ski boots or snowboard bindings), but mittens tend to keep your hands warmer. If you want the best of both worlds, you can layer glove liners under your mittens.
Socks
Only wear one pair! Today's synthetic, insulated socks work (and fit) best in ski and snowboard boots if you only wear one pair. And, believe it or not, the thin ones function just as well as the really thick kind. Regardless of which you choose, make sure they feel comfortable in your boots and don't bunch up.
Walking Around Safely at Ski Areas
When you arrive at a ski area parking lot, you should anticipate winter conditions, including: snow, rain, ice, sleet and generally slick, and often in low visibility conditions. Give yourself additional time and walk with extreme care, keeping your nose over your toes and your hands out of your pockets for balance. Do not carry too much equipment, and wear suitable winter footwear with traction.
Sledding and Snow Tubing
Ski areas typically prohibit sleds and sledding on the trails and around the base area, but many offer designated snow play areas or snow tubing operations in or near the base area. Check with your ski area about snow tubing options.
Helmet Safety

Helmet Safety
Helmets are Important
We urge all participants to wear a helmet, but to ski or ride as if they are not wearing a helmet. Whether you’re an experienced rider or just hitting the slopes for the first time, wearing a helmet can make all the difference in staying safe and enjoying your time on the mountain.
Skiing and snowboarding in a controlled and responsible manner is the primary
safety consideration for all. A participant’s behavior has more to do with
their safety and that of others than any piece of equipment.
Limitations of Helmets
Helmets protect your head, but they don't prevent all injuries, especially from high-speed impacts or collisions with obstacles. Always ski within your ability, stay alert, and follow safety guidelines. It’s important to understand that helmets are far less effective at higher rates of speed. Remember, a helmet is just one part of staying safe on the slopes.
Helmets and Kids
Wearing a helmet while skiing or snowboarding reduces the risk of head injuries. They are most effective when you ski or ride at slower speeds. Bonus: they also keep your head warm! Not all ski areas require helmets, but it is a good idea to outfit your child with one and wear one yourself.
While wearing a helmet is a personal choice, you would be setting a good example for the young ones in your family if you chose to wear one while skiing or riding. Nearly all ski areas rent helmets to the public. Make sure your helmet is properly fitted and the chin strap is fastened.

More People Are Wearing Helmets
The overwhelming majority of skiers and riders are wearing helmets. Helmet usage has grown dramatically over the last two decades. The overall percentage of participants wearing helmets increased from 25% in the 2002–03 season to 90% in the 2023–24 season.


Collision Prevention

Collision Prevention
We're Safer Together
The word FREEDOM is often used to describe snowsports! But it is important to remember that we are sharing the slopes with skiers and riders of all different ages, abilities and sizes. Your awareness of those around you and of the surrounding environment, as well as responsible skiing and riding, are the best ways to reduce the risk of a collision between you and another skier or with an object.
Sometimes, skiers collide. The tragedy from an on-snow collision inspired the development of the #RideAnotherDay campaign. This safety program is a main pillar of collision safety.
Tips for Avoiding Collisions While Skiing and Snowboarding
Complementing the Responsibility Code and its 10 tenets, #RideAnotherDay promotes three actions every skier and rider can take to help keep themselves and those around them safer on the slopes.
Take These Three Actions
Be Ready
Be ready to slow down and avoid objects or other people at any time. Ski and ride in such a way that you are always able to control yourself regardless of conditions and avoid others and objects you may encounter on the run, groomed or otherwise.
Stay Alert
Stay alert to what’s going on around you, especially other skiers and riders. Being aware of those around you and changing conditions will help you have a fun and safe day on the hill.
Plan Ahead
Ease up at blind spots, check uphill when merging onto trails, and give other skiers plenty of room when passing. Look out for spots on the run where traffic merges or you can't see what's coming next.
Why We Ride Another Day
Five year-old Elise Johnson was just learning to ski when an out of control rider struck and killed her. Elise's parents, Kelli and Chauncy Johnson, wanted to help prevent such accidents befalling other families. The Johnson family generously offered a donation to create the #RideAnotherDay campaign in partnership with NSAA.
Space, Not Speed
The campaign encourages awareness, responsibility and common sense to reduce the risk of on-mountain collisions between skiers and riders. Watch and read the video and article below to learn more about the Johnson's story and what you can do to help make ski slopes safer.
Triangle of Safety
Collision Awareness
Snow Angel Foundation’s Triangle of Safety
Speed
Always maintain control over your speed and stay within your limits. Go with the flow, especially in congested areas. Slow down when you are unable to see over a roller. Constantly look ahead to scan for other people, objects, rocks and trees. When you enter a steep section, slow your speed and make sure it’s clear to proceed.
Space
Yield to the downhill skier/rider because they always have the right of
way. Give other
riders space and anticipate downhill traffic.
When passing other
skiers or riders, do
so with caution and make sure there is enough room to pass them safely.
Respect the
personal space of others and communicate your intentions when necessary.
Self
Ultimately, you are responsible for your safety and the safety of others. Accidents happen when we’re tired or frustrated, so if your legs are getting to that point, take a break. Protect yourself and others by wearing a helmet and making sure your equipment is in good working order. Check in with yourself before you start skiing or riding and practice situational awareness.
By doing these three things on every run, you'll be helping to keep the slopes safer and enjoyable for you and everyone else.
Mountain Biking

Mountain Biking

Mountain Biker's Responsibility Code
The Mountain Biker's Responsibility Code has been developed to help inform riders about the information, decision-making and actions every rider should know and take prior to and while riding on the variety of trails within a ski area’s trail network.
Similar to the 10 points of Your Responsibility Code, this code reminds riders that there are elements of risk in mountain biking that common sense and personal awareness can help reduce. Check with area employees to see if there are other local considerations for which you should be aware, such as wildlife.
MOUNTAIN BIKER'S RESPONSIBILITY CODE VIDEO
Mountain Bike Safety Checklist
Prepare for a safe and enjoyable ride with the right gear and knowledge, including learning about
lift safety for mountain bikers.
Here’s a concise checklist for mountain bike safety:
The Essential Safety Gear
-
Helmet: Meets mountain bike helmet safety ratings.
-
Gloves: Durable and well-fitting.
-
Glasses: Shields eyes from debris and UV rays.
-
Protective Pads: Elbow and knee pads.
-
Sturdy Footwear: Good grip and support.
Additional Safety Equipment to Consider
-
Full-Face Helmet: Extra protection for downhill biking.
-
Body Armor: Chest and back protectors.
-
Hydration Pack: Easy access to water.
-
First Aid Kit: For minor injuries.
-
Multi-Tool: Quick repairs on the go.
-
Cell Phone: For emergencies.
Signage for Mountain Bike Trails
The green circle, blue square and black diamond indicate different degrees of difficulty, relative to the trails in that area. See below for additional elements in the signage that indicate different types of trails.
-
Green Circle: Easier
-
Blue Square: More Difficult
-
Black Diamond: Most Difficult
-
Double-Black Diamond: Extremely Difficult, Use Extra Caution
It’s important to remember that trail ratings are relative to that area, meaning the easiest slope at one area may be considered a more difficult slope at another. If you are unsure about which trail is right for you, take the green trails until you are familiar with the mountain and the trail network.
The wrong choice could send you down a trail that you aren't ready for. Be sure to check
out the trail and features before you ride them, start small and work your way up.
Other Trails Signs

Beyond expert or professional-level trails are those requiring professional competition-level skills. Before using these trails, riders may be required to sign specific releases or attend training. Consult the ski area before attempting to use these trails for the first time.

Skill development areas or skills parks are specifically designed to provide riders the opportunity to learn and develop new skills away from the trail environment. The features and obstacles in a skills park may or may not directly reflect the size or type of those you may encounter on all of the trails in the bike park.
Remember, it is your responsibility to inspect trails and features before attempting.
Our Commitment to Safety
Trained Staff: Our team members undergo rigorous training in safety procedures, first aid, and emergency response to ensure a swift and appropriate response to any situation.
Regular Inspections: We conduct thorough inspections of all equipment and facilities to identify and address potential hazards.
Clear Signage: Informative signage is strategically placed throughout the resort to remind guests of safety guidelines and potential risks.
Safety Education: We offer educational resources and programs to promote responsible behavior on the slopes and awareness of potential hazards.
Ski and Ride Within Your Ability: Choose trails that match your skill level and avoid taking unnecessary risks.
Use Proper Equipment: Wear a helmet, ensure your bindings are adjusted correctly, and use appropriate gear for the conditions.
Respect Others: Be mindful of other skiers and snowboarders and yield to those downhill.
Stay Hydrated and Fueled: Take breaks, drink plenty of water, and eat nutritious snacks to maintain your energy levels.
Report Hazards: If you see any unsafe conditions or potential hazards, please report them to a staff member immediately.
Together, we can create a safe and enjoyable experience for everyone at Mount Kato. By following these guidelines and being mindful of others, we can ensure that your visit is filled with fun, excitement, and lasting memories.